
Save View Option in TallyPrime
TallyPrime Release 2.0 features a save view option for its users. If I want to generate some monthly reports on payment vouchers with specific configurations again and again then it will become a time-consuming and lengthy process at the same time. I need to cut my time for preparing tax computations and filing tax returns within the due date.
So, How can I do that?
One can use the savior- “Save View” Option. This option allows the user to save the reports generated earlier in the Original View. This is a kind of report which you can view in Saved Views for future use. You can also use Change View and Delete View after their usage is over.
Benefits
- This option enables users to save viewed reports for future reference. The user can save the configuration at his/her convenience before closing the tally. The user doesn’t need to reconfigure the settings every time he opens the tally window.
- TallyPrime also allows other users to access the Saved Views. They can delete or change Saved Views as per their preference. For security purposes, the user can also restrict access to Saved Views.
- As stated earlier, there is an option to Manage Saved Views. This option provides users the liberty to save, delete or change viewed report
Steps to Save View Report
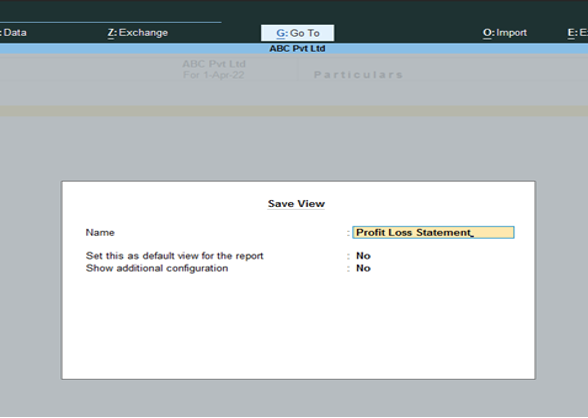
- Set your configuration for the original report and generate the required report.
- Press Ctrl + L for Save View.
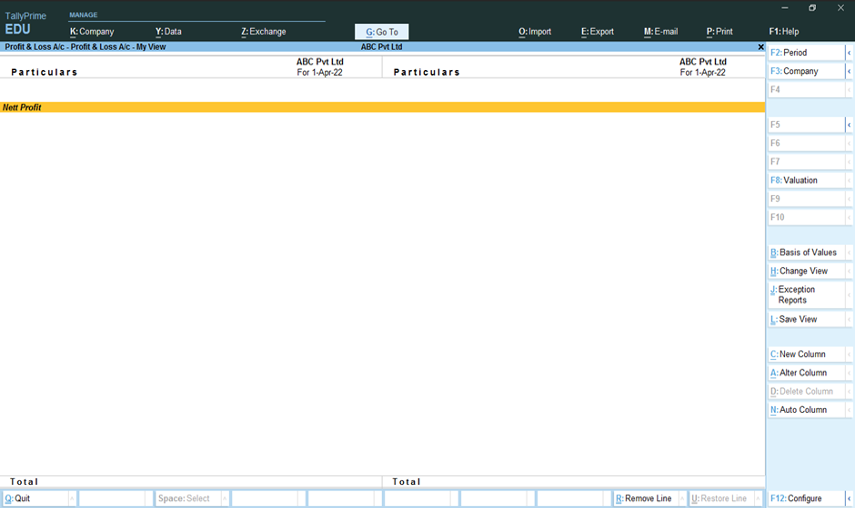
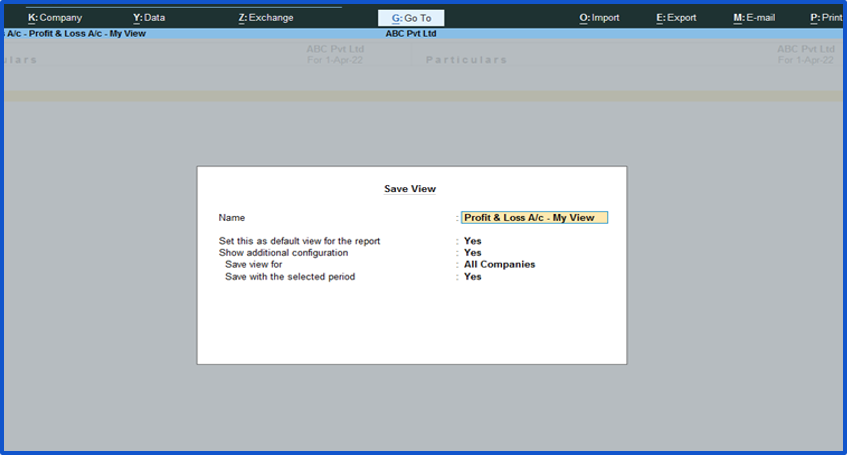
- For example, Profit & Loss Account for the Financial Year ended 31.03.2022 is generated. Now, TallyPrime saves the report named as Profit & Loss A/C- My View.
- Change the name prefilled by the software as per your convenience.
- If you want a DEFAULT VIEW of the report, set Yes in the dialog box.
- If you want to CHANGE VIEW, then press Ctrl+ H to select Show Original View.
Additional Configurations
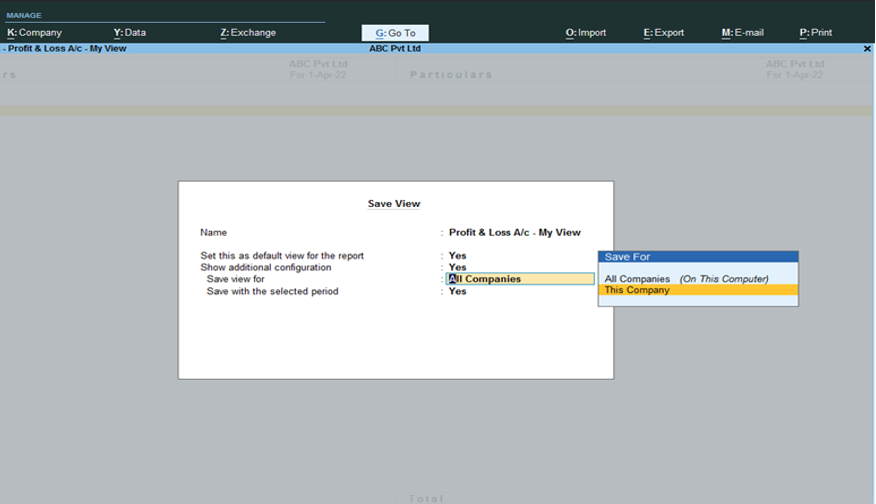
- If the additional configuration is set to No then the default option shall prevail. The option will make the save view apply to All Companies (On This Computer).
- Hence, to apply the option to the company level, set the additional configuration to Yes and click on This Company.
- All Companies option would enable the save view option for all the companies running in the tally. This Company option would enable a save view for this company only. It also allows users to share data across multiple users/computers.
- There is no data loss issue as explained earlier in this article. However, use the All Companies (On this Computer) option only for remotely allowing users to access the company data.
- If you want to open reports specific to a master (for instance, Creditors for Expenses, Creditors for Goods, etc.) then set it to Yes for specific masters. For opening the same report, you don’t need to go to the master ledger. The saved reports can be seen in the Save View option with the updations that are made in the sub-ledger.
- You can also save the selected period (a month, a quarter, or an annual period) for your reports.
- Press Ctrl+A to save the view. For opening the saved view, use the Go To or Change View option (Ctrl+H).
Comparative Reports
- TallyPrime allows users to compare data across multiple companies for different periods.
- Users can save view containing several company data by using the All Companies An All Companies option can be used to save view consolidated report of a group company also.
User Access to Report
How can we give users access to the save view or even allow editing and deleting tasks? By default, users are granted access to edit or delete reports in the save view option. Following is the procedure to restrict user access to the save view:
- Go to Security Levels and press Alt+K (Company) for User Roles.
- Select Allow to save report views for This Company – No.
- Also make sure to set Allow to delete saved views for This Company- No.
- If a user has been assigned restricted access for one particular report then it shall also apply to the saved view of the report.
- Press Ctrl+A to accept the screen as usual.
Manage Saved Views
You can easily open saved views, set/alter default views, access original views, and delete views on TallyPrime.
Open Saved View
- Press Alt+G to Go to the menu for saved views of all the reports generated.
- Press Ctrl+H to see the list of views saved by you.
- You can also set the saved view as the default view by selecting the option- Set this as the default view for the report as Yes. This will ensure that the user is able to see the same report every time he opens the tally.
- If you have generated reports in the save view option for several companies, then you should load all the companies on the computer to open the save view report. Otherwise, a pop-up would appear that will warn you that all the companies are not loaded.
- For example, the Consolidated Balance Sheet of a Group Company can be generated with set configurations in the save view option. The subsidiary company should be loaded on the computer to view the consolidated report.
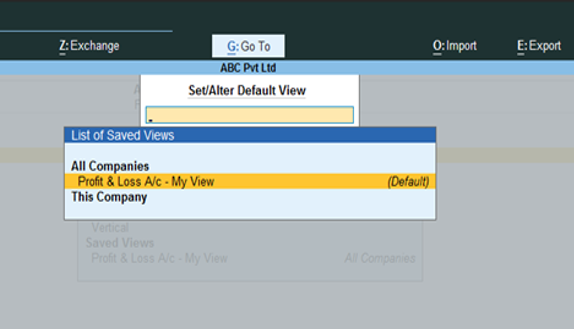
Set/Alter Default View
- Press Ctrl+H in the original report to change/set the default view.
- Select one of the saved views and press Enter to set it as default.
- It is simple to change the default settings. When you use the save view option, select and press Enter to change the default view.
- If you have set the default view under This Company and All Companies then the default view under All Companies shall be displayed when you open the report.
- Similarly, if you want to remove the default setting, then open the Gateway of Tally and press Ctrl+H to change the view. Then select Set/Alter Default View. After selecting the view from the list, press Enter.
Access Original View
- For accessing the original view of the saved view, press Ctrl+H, and select Show Original View.
- Then press Enter. The original report can be viewed easily.

Change Details of a View
You can successfully change the details of a view by following the steps below:
- You can save view the changes as a different view from the saved view by pressing Ctrl+L and providing a different Name in the dialog box. Then save the changes by pressing Ctrl+A.
- You can also override an existing view from the saved view by pressing Ctrl+L. Then provide the name of the existing view and press Ctrl+A.
Delete View
Some views become irrelevant after some time. Hence, we want them to be removed from the generated reports.
- Go to Change View by pressing Ctrl+H and selecting Delete Saved Views.
- On the screen, you will be able to clearly see the views available under All Companies and This Company.
- Select the view you want to delete. Press Enter and again press Enter or Y to confirm deletion of view from the list.
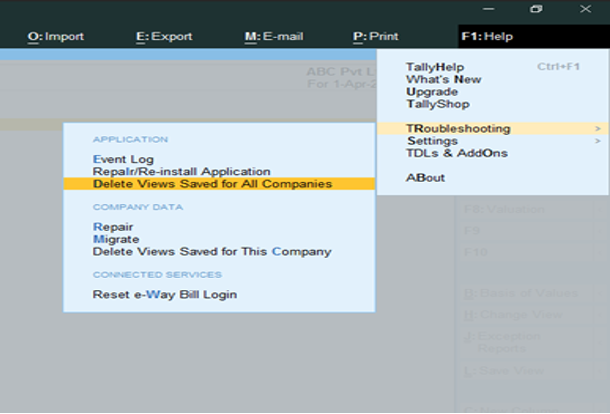
- If ALL THE VIEWS ARE TO BE DELETED, then press F1 and then select the troubleshooting Select one of the following options as per your preference-
- Delete Views saved for All Companies (Application)
- Delete Views saved for This Company (Company Data)
After selecting an option, press Enter and again press Enter or Y to confirm the deletion. You would be asked to reconfirm deletion by pressing Enter or Y again.
TallyPrime has introduced a time-saving feature for every person struggling with reports. It has brought superb flexibility in facilitating user access restrictions and changing details of the view.
